XenonZcar.com - Z31 Automatic to Manual Transmission Swap
These instructions are based on swapping the A/T from an 89T for a 5-spd from an 88T. It will work very well for pre 87 cars except for the electronics. Some of the stuff is for turbo cars only and I'm sure you'll find out as you do the swap.
Transmission Specs
- 84-89 Z31 NA: FS5W71C: Nissan 5spd (medium)
- 84-86 Z31 Turbo: FS5R90A: Borg Warner T-5 5spd (weakest)
- 87-89 Z31 Turbo: FS5R30A: Nissan Turbo 5spd (strongest)
- 84 only 4N71B
- 86-89 E4N71B
- N/A: X8203
- Turbo: X8206
- N/A: GXA
- Turbo: G
Advice
- Download and read the AT and MT sections of the Factory Service Manual
- Make every attempt to get a transmission from the same model car otherwise you will have to modify the drive shaft flange for it to fit correctly.
- Whenever you take a part out, reinsert the retaining bolts whenever possible so you know where everything goes when it comes time for reassembly.
- If you have a friend who is willing to help you, get them. The job is much easier and faster with two sets of muscles in place.
Parts You Need
A lot of the stuff you can get from a junkyard. But, some stuff you will have to buy new.
Essential Stuff
- A full complement of tools? You don't need any special tool but make sure you have a full set of basic wrenches, sockets, etc. Also, be prepared to purchase some large wrenches
- Flare nut wrench
- Transmission fluid
- Brake fluid
- Clutch alignment tool. Get it, you'll need it
- Transmission jack. Can be done with a standard jack but more difficult. Rent one
- Jack Stands or some way to lift the car reasonable high up so you can work underneath comfortably
- Copy/print all necessary pages from the fiche, if you don't have a shop manual, even if you do, get the fiche prints
- Transmission rear oil seal
- Engine rear oil seal
- Moly type grease for oil seal installation
- PB Blaster or WD-40
- Some anti seize compound for bolt the threads
- Some thread locker compound. Medium strength.
Stuff From the Donor 5-spd Car
- 5-spd Transmission, from bell housing to tail, including all bolts, washers, pins, etc. The whole works. Make sure both the neutral switch and reverse light switch and their harness are attached to the Transmission, as well as the shifter and its hardware.
- Dust plate (2) that attach to front end of Transmission /back end of engine
- 5-spd drive shaft
- 5-spd flywheel. You may have to get new, depending on condition of used one
- Flywheel to crank bolts
- Speedometer cable depending on analog/digital Speedometer
- Speedometer pinion O-ring - new
- 5-spd Transmission mount and cross member. You may need new mount depending on condition of rubber bumpers on used one
- 5-spd Clutch pedal assembly
- 5-spd Brake pedal assembly
- Clutch master cylinder. May have to buy new
- Clutch slave cylinder. May have to buy new
- Clutch dampener. May have to buy new
- Clutch hydraulic line from 5-spd car
- Front Down pipe from 5-spd car (don't have to get the bolts for this)
- 5-spd ECCS (computer)
- Clutch pressure plate
- Clutch pilot bushing
- Clutch throw-out bearing
- Make sure to get ALL bolts, washers, clips, pins that attach any of the above items to the 5-spd car chassis.
Begin Work
- Have a shop resurface the flywheel if needed.
- Disconnect the battery;
- Take out the center console
See fiche section 7E12: or Section 11 Sub Section 21 of the Haynes manual.
There are a couple of bolts behind the "300ZX" plate on the center console and a few more in the console box.
- Take out the A/T shifter:
See fiche section 4J08:

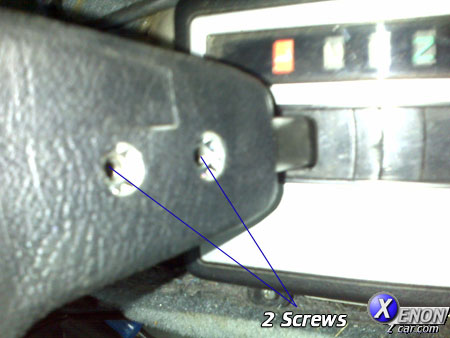
Remove the 2 screws on the back of the shifter
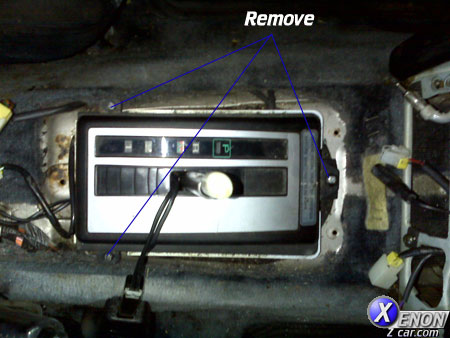
Now remove the 3 screws holding the cover to the shifter plate
Disconnect the two harnesses that are sometimes deep into the driver side Transmission well carpet.
You'll also need to disconnect the shift link mechanism from under the car. I did this later when I jacked up the car.

- Install the brake pedal
I started with the most difficult step - replacing the brake pedal (see fiche Section 4L05).
- Disassemble you're A/T brake pedal only from it's mounting
- Disassemble the 5-spd pedal from its plate (keep spring/shaft)
- Start putting the pedal in. A royal PITA to align the pedal shaft while trying to maintain the spring in position in order to bolt her in place -you'll see what I mean when you get there. PATIENCE, A LOT OF IT, and it'll eventually get in. I used a rope to pull the spring compressed, then with a guide pin at the other end of the bore for the brake pedal shaft (item #46582), I was able to get it in. Torque tightening bolt to 22-30ft-lb
- Install the clutch pedal assembly
The clutch pedal assembly includes the pedal itself, its mounting bracket and the clutch master cylinder.
- If using the old master cylinder, make sure to clean it thoroughly.
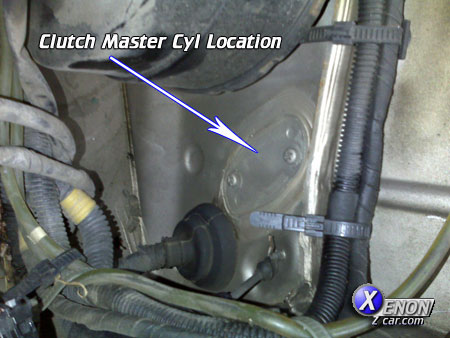
- Take out the windshield washer fluid reservoir and on the firewall you'll see a plate bolted where the clutch pedal shaft will go through.

- Take that plate out
- Install the clutch pedal and master cylinder
- Torques: Clutch master cylinder securing plate: 5.8-8.7ft-lb; Clutch pedal push rod: 5.8-8.0ft-lb; Clutch pedal lock nut:12-16ft-lb.
- Don't install the clutch hydraulic line at this point as there is not enough room yet.
- Clean 5-spd Unit
Clean the 5-spd unit as best as you can.
- Drain all oil out of it
- Replace the rear Transmission oil seal
- Replace the throw out bearing
- Put some grease on the fork
- Depending on the condition of the rubber boot, you may have to replace it also
- Make sure the neutral and reverse light switches don't have frayed wires. If they do, you'll need new switches.
- Inspect the Transmission mount and cross member. Take the whole thing out and look at the rubber pieces. They may develop cracks. In that case, replace them.
- Raise the car up
Raise the car up as high and as safely as possible and USE JACK STANDS to support the car. You have to raise it high otherwise the Transmission dip stick tube will not clear frame when time comes to remove transmission.
NOTICE! Never work under car without properly securing jack stands under the vehicle.
- Remove front tires for more room.
- Drain whatever oil is in the Transmission
- Disconnect all the electrical cables to the Transmission. The Large cable that goes to the battery area is the inhibitor switch cable. Take not to this cable as it will come in handy later on.
- Disconnect the oil temperature switch harness if you have it? (It's the one that connects to the oil pan just above the drain plug and to the left of the sending unit. This harness is very easy to break as you will be working in the area.)
- Disconnect the battery ground to the Transmission/engine interface.
- Disconnect the vacuum line that comes from the passenger side of the engine to the Transmission. Use a rubber plug to plug the hole left in the engine side, then fasten it down with a plastic tie down. You have to fasten it down otherwise at boost, it may come loose.
- Disconnect the oil cooling lines from Transmission end and radiator end. Blow out oil from radiator and plug radiator.
- Disconnect the speedometer pinion. Be careful here as you need it again. Get a new O-ring for the pinion.
- Remove Exhaust Components
From here on, we'll start taking out bolts. You will break some (especially those in the exhaust area) so be prepared to purchase new ones. Advice: Spray ALL exhaust bolts with some kind of solvent (PB Blaster, WD-40 or some other stuff like that) to soak them up real good, perhaps even overnight.
- Unbolt the catalytic converter. First remove the bottom heat shield, cat to front pipe bolts, and cat to middle tube bolts.
- Take the cat out and unbolt the cat upper heat shield.
- Undo the three bolts that hold the front tube to the exhaust manifold/turbo outlet. Be careful because you may need to re-spray these with PB Blaster and these bolts may break. So take it easy!!! Additionally, there is an emissions (AIV) tube that runs from the side of the front-tube to the front of the engine that makes this double PITA to takeout. Impossible to detach this tube from the front tube - cut it from the front tube and replace with a new one, it is very easy to replace. If you can get a 5-spd front tube, use it because the heat shield of the A/T front tube will interfere with the manual Transmission mount. The AIV tube is very difficult to locate in the fiches. The part number is 14823-19P00 for N/A and 14823-19P05 for turbo (fiche #2E5, item #14820N, right figure)
- Undo the rear support cross bar/bracket that connects both frame rails. Be careful here as well, those bolts are very easy to break and hard to drill out!
- Disconnect the parking brake cable
- Remove Drive Shaft & Transmission
Disconnect the drive shaft at the differential side. Remember To rotate the wheels to get to all the bolts.
- Slide the drive shaft out of the Transmission and keep it in a safe place.
- Now, use a Transmission jack or floor jack to support the Transmission and put another jack (regular scissors type will do) underneath the engine oil pan (use a wooden block on the jack) to support the engine.
- Undo the Transmission insulator mount bolts.
- Undo the starter
- Undo the converter to flex-plate bolts through the hole where the starter was installed. You'll have to rotate the flex plate (a flywheel for automatic Transmissions) to get to all the bolts.
- Undo the Transmission-to-engine bolts (note: the different lengths). You will have a hard time undoing the two top most bolts. A tip is to drop the Transmission mount some and that lower the jack under the engine some such that the Transmission has a slight tilt downwards at its tail. Not too much otherwise you'll over stress you engine mounts and damage them. Just enough to give you enough clearance to undo the top bolts. Remember this as You'll need to do this again when putting in the 5-spd Transmission.
- With the help of a friend, or just by manipulating the Transmission jack, gently pull out the A/T, drop it and, voila!!! It's out. Remember that the converter is loose with lots of oil in it, so it's heavy.
Replacing Rear Oil Seal, Flywheel and Clutch Assembly
- Remove the small circular drive plate and flex plate. Keep drive plate!!!
- Replace the rear oil seal on the engine. Do This!!! The car is old and this is probably the only chance you'll have to do this, so just replace it.
- Now is the time to install the clutch hydraulic tube (remember that???), the slave cylinder and the damper. Use a flare nut wrench and stick with torque specs!!!
- Torque specs for clutch components: Damper bolts: 5.8-8.0ft-lb; Operating cylinder (slave cylinder) bolts: 22-30ft-lb.
- Gently press the pilot bushing in place. It is made from brass and if you push too hard, it'll buckle. How far to push in? Just remember that it will have to be pulled out later if you screw up or if you have to do a clutch job, so leave some space between the far end of the bushing (the end towards the engine) and the end of the bore provided. You don't want to push it till it bottoms out in the crank!!!
- Insert the upper and lower dust plates in place here. The small one goes in first towards the engine, then the full one. They may fall out, just make sure they sit on the dowel pins provided on the engine end. I don't quite recall but they can be put in later.
- Insert 5-spd flywheel in place (did you remember to resurface it????), set small circular drive plate in place and bolt assembly to crank shaft. (Torque to 72-80 ft-lb.)
- Now bolt the clutch plate assembly see fiche section 4B01 to see how things go. The clutch pressure plate next to flywheel, clutch disk. Here is where the clutch alignment tool is a BIG help!!! Torque clutch pressure plate to flywheel bolts: 16-22 ft-lbs.
- Do your best to align the Transmission input shaft to the drive shaft. It may be a struggle. The Transmission may align at first shot or it may take you a few hours to get it all lined up.
- Once the Transmission is aligned, bolt her back to the engine (torque to spec ? different for the bolts due to different functions,22-29ft-lb for bolts just below the starter and 29-30ft-lb for the top bolts, refer to manual) Don't forget to reinstall the dust plates and remember the tip about the top bolts???
- With the Transmission is in place, and the jack still under Transmission and scissors jack still under the engine. Now, bolt Transmission cross member and bushing in place (torque to 33-44ft-lb; I couldn't find torque reference for this, so I used engine mount torque reference)
- Reinstall oil temperature sensor harness.
- At this point, you can reinstall the starter, and the negative battery terminal.
- Reinstall the drive shaft (follow required torques)
- Reinstall exhaust components. If turbo and you're using same front tube, the heat shield will interfere with the Transmission mount. I used a wooden hammer to flatten her down by the mount area till it fit well.
- Install the original speedometer pinion with new O-ring
- Install 5-spd drive shaft (29-33 ft-lb).
- Reinstall exhaust components (front tube to engine:34-45ft-lb; to cat: 23-32ftlb, cat to middle tube: 31-42ft-lb, heat shields, rear rail frame x-member,
- Readjust emergency brake (adjuster torque: 2.3-3.2ft-lb). Make sure you get 8-10 notches before it fully tightens, otherwise, readjust.
- Fill up the clutch master cylinder (use DOT-3 brake fluid) and bleed the system. Start with the damper, then slave, as best as you can. (A friend come in handy here too.)
- Have the brake pedal and clutch pedals free play adjusted as best as you can
When you look in there (where the A/T just came out of), you'll see a flex plate and a doughnut steel ring where the nipple of the converter sat. This ring will have to come out. Here is your next most difficult challenge (brake pedal was #1). Two things you can do here: use a puller to get it out (Autozone has some for rent, harbor Tools had an excellent one). You can also use a wrench to pop it loose in some cases or even use a socket and grease method to get it to pop out of the crank. I used a Blind side Puller that I purchased and it came out with no issues.
You've cleaned and prepped the 5-spd Transmission. Now put it on the Transmission mount and slide it under the car.
Several ways of doing this. I threaded a plastic tube from the engine bay to Transmission oil inlet and put in 5-1/8 qt of Redline MT-90 synthetic (4-1/4 qt for N/A). There's no way you can miss the quantity because as soon as oil starts dripping from the Transmission, it's full
Electronics
Now that all the hard part is done the electronics are next.
- Put the front tires back on.
- Do not drop the car just yet, you may need to go back there.
- Here you'll have to deal with the inhibitor switch. This is the 8-pin connector from the Transmission that ended up in the battery area. Remember you had to disconnect it and I told you to Note it?
Refer to the following for 87-89 cars only

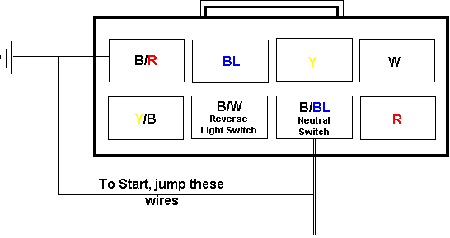
- You are looking at the pins on the inhibitor switch FROM the Transmission side ? not the end attached to the engine!!!
- To START, jump the Black/Blue (B/BL)with the Black/Red (B/R)wire
- If you want to start only when clutch is depressed, and for the cruise control to work, perform this jump at the clutch switch (you may need to use a universal switch rather than the Nissan clutch switch). I haven't done this yet.
- If you want the reverse light to come on when you put car in reverse, connect the blue wire from the reverse light switch on Transmission side to the B/W wire on the inhibitor switch. Then connect the black wire (this is the ground wire) from the reverse light switch on Transmission side to the B/R wire on the inhibitor switch.
Refer to the following for 85-86 cars only
- On the 8 pin connector below the battery (the one that connects to the inhibitor switch. If you look at the plug that is physically attached to the wires going to the inhibitor switch the 8 wires are Red/black, Black/Yellow, Black/white, Black/blue, Red, White, Yellow and Blue. We are only interested in three of them they are Red/Black Black/Yellow and Black/white.
- The red/black is a ground. For starting the Black/Yellow must be grounded (connected to the R/B) however whenever this wire is grounded the cruise control is disabled. If you have a BWT5 5spd or later model Nissan 5spd with a neutral switch, just connect these 2 wires to the neutral switch on the Transmission.
- Now car starts with Transmission in neutral and cruise control works when car in gear.
- Now connect the same B/R and the B/W wires to the reverse switch in the Transmission and now your backup lights come on when ignition is on and Transmission is in reverse. Don't worry about order of 2 wires to neural switch or reverse switch as the switches just connect the 2 leads together when in the proper gear.
- Also please do attach the switch that came with your clutch pedal bracket to the harness wire that is just lying there to be used. It protects your car by disengaging cruise when you step on the clutch (and make sure it and both brake switches have proper nylon bumpers to activate the switches.)
- Now if you use an early Nissan 5 speed with no neutral switch I suggest this. Get a turbo headlight washer switch at junkyard. It has a hole for it pre cut in your center counsel. Just pop it in and connect the R/B and B/Y wires to it. Push the switch when you want to turn key and start car (neat theft deterrent). And once switch is released the cruise works normally.
Refer to the following for 84 cars only
On an 84T auto it had a 4N71B auto with an inhibitor switch with only 4 pins. Looking at the plug physically attached to the 4 wires which are physically attached to the inhibitor switch place the locking tab at the top now looking into the connector with the wires exiting away from you. The upper left wire is wire 1 the lower left is 2 the upper right is 3 and the lower right is 4. Connect wires 1 and 2 to the neutral switch and wires 3 and 4 to the reverse switch.
Start Your Engine
- Congrats, you did it. Now, drop the car and start the engine. You may hear noises but you will be able to tell the bad from the good.
- Drive to your mechanic to have the pedals adjusted and the clutch bleeding done correctly.
- You may hear a whine when you initially lift off the clutch, that's OK. Let the clutch hardware wear in and you will be OK.
Required Adjustments
You'll probably notice that your idle is approximately 1000 rpm higher!!! It needs to be adjusted if you want to pass emissions. For the N/A cars, use the idle adjusting screw by the throttle body. For the turbo, you'll need the 5-spd ECCS for idle adjustment.
