Z31 Tokico Illumina Rear Shock Installation
One of the best upgrades for your Z31 is a set of New Shocks. I chose a set of Tokico Illumnias as they are 5-way adjustable. This means for normal driving you can have the shocks set to a lower setting and have a smooth ride and when you are at the track you can turn the shocks valving up and have a nice stiff platform for cornering. The part number BE2740 is for both non turbo and turbo cars are the same weather or not you have adjustable suspension.
Items Needed
- Jack Stands
- Floor jack
- #2 Phillips Screwdriver
- Various Metric Sockets ( 14mm, 17mm )
- Ratchet
- Breaker Bar
- Tokico Illumina Part # BE2740
- Dust Boots
- Pliers
- Vice grips
- Torque Wrench
Removal
- To start Set parking brake and Chock the front wheels.
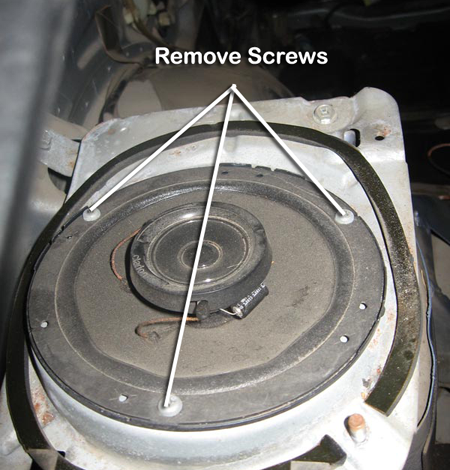
- Remove the rear speaker covers and remove the speakers by removing the 3 Phillips head screws.
- Now jack the car up in the rear using the differential as a jacking point.
- Set your jack stands up at the rear cross member to support the car and remove both rear wheels.
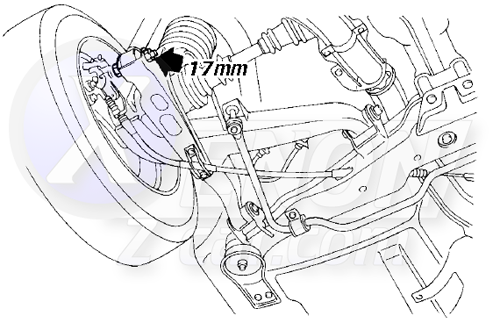
- With the car in the air, move your jack to the rear spring seat to shock mount.
- Jack it up just to relive pressure ,remove the lower shock to spring seat bolt. This is a 17mm bolt and nut.
- With this out you can move to the inside top mount. This is the hard part.
- Remove the three 14 mm nuts from the top mount. These are very hard to reach some Creative engineering with extensions and swivels to get to these.

- Now I cut a small part of the speaker mount out to allow easy adjustment of the Illumina shocks but this is not a must.
- Once the 3 nuts are out the shock can be removed.
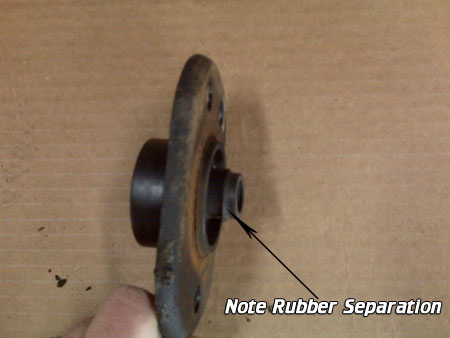
- Take the shock to your workbench and use a wrench to hold the shaft from turning and remove the top nut holding the shock to the top mounts. (NOTE: some aftermarket shocks do not have the flats on them for a wrench and you will need to use a vice or vice grips to hold the shaft from turning.)
- With this off you can transfer the top mounts over to the new Shocks.
Installation
- Now that you have everything apart you will notice that you have a few extra parts that cam with the new shocks.
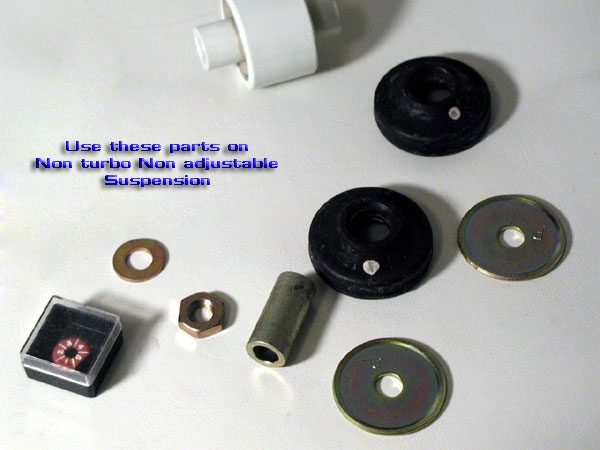
- On non turbo cars without adjustable suspension you have a long spacer left and with turbo Adjustable suspensions you will have the rubber bushings and large washers along with the small spacer the came on the shock. Installation is the reversal of removal at this point.
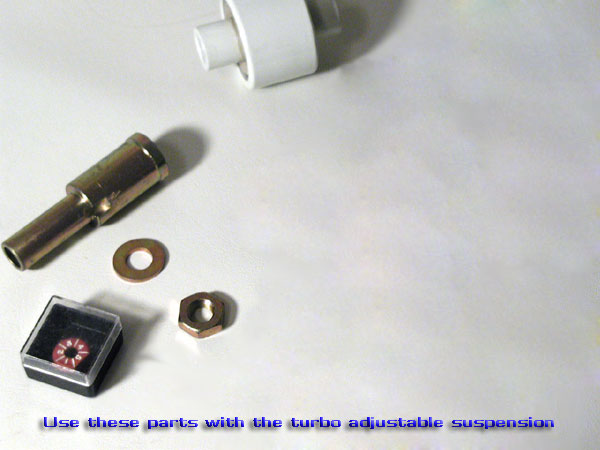
(NOTE: On cars with the adjustable suspension you MUST reuse your old washer for the top mount. Otherwise the shock will push through the rubber mount.)