
XenonZcar.com - Z31 VG30E to VG30ET swap list
This question comes up so many times every week we might as well address it here. "I bought a Non turbo Z and I want to go faster. How can I make it faster for cheap?" Well By doing a turbo swap or adding a turbo to your Non turbo engine is the quickest and cheapest way to make power. A setup using the stock Z31 components with a boost controller can net you 300hp plus.
To begin with you should have already located a parts car or all the parts for a turbo conversion, this alone can be a challenge. Needed for converting an N/A car to turbo are the following parts from an 84-87 turbo Z31 if using a t3 turbo or 88-89 when using the t25 turbo
Main Parts List
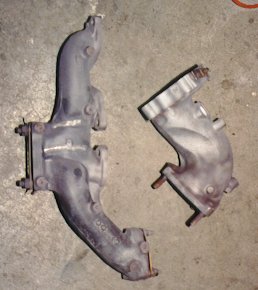
- Drivers side exhaust manifold
- Down pipe
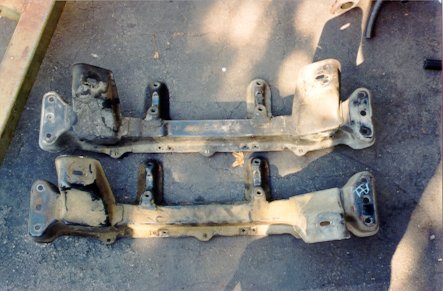
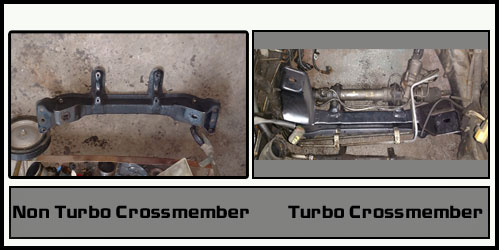
- Front cross member
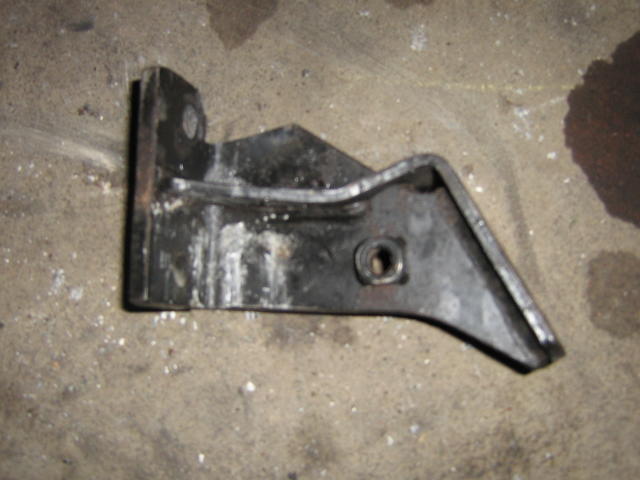
- Drivers side engine mount bracket (bolts to block)
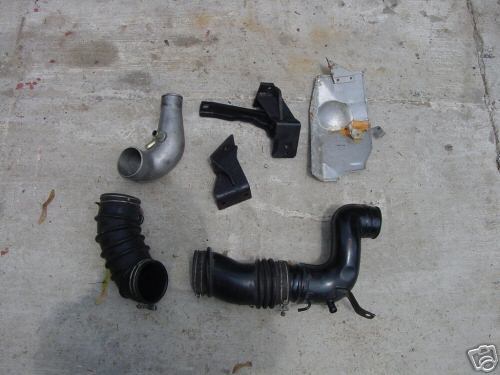
- All intake piping (from Airflow meter to Throttle body)
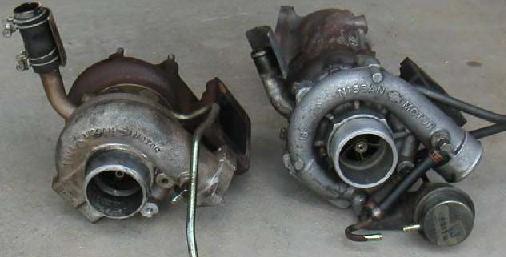
- Turbo
- Oil pan - Turbo Pan as a bung for the turbo oil return
- Turbo oil lines (and water lines if applicable) - 84 turbos did not have water cooling
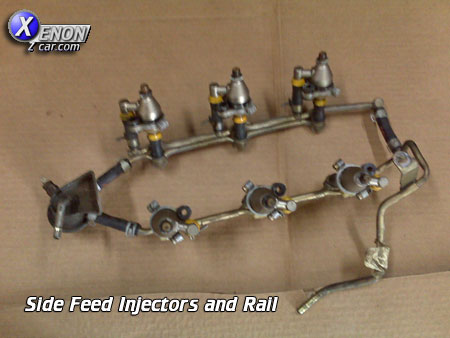
- Fuel injectors (260cc/min instead of 180cc/min)- Two styles depending on Lower Intake manifold
- Correct ECU to match the injectors and O2 Sensor you are going to run
- All applicable gaskets and Fasteners. You will likely break some and likely it will be the exhaust manifold studs. They are 8mm x 1.25 pitch in size and you can get Replacements from Dorman
Note: If you are turbo charging a 84-86 non turbo you will also need the Alternator mount, tensioner (and longer belt for application because the alternator mounts on pass. side instead of drivers side)
Note II: If using a Pucker Factory Turbo Relocation Pipe you will not need the Crossmember or the intake piping as you will need to plumb the turbo with custom pipes. You also will lose the Air Conditioner Compressor.
It is recommended to remove your engine to do this swap as the Crossmember and driver side exhaust manifold need to be swapped. This is not easily done inside the engine bay but can be done with alot of effort.
Fuel System and ECU
***Warning No not try to run a turbo on a Non turbo fuel system as the Fuel maps and injector sizing are configured way too lean for a turbocharged application***
First thing you need to do is to relive fuel pressure from the fuel system. easiest way is to disconnect the connector under the hatch carpet to the fuel pump and then crank the car until it does not fire.
You can now remove the full air Intake from your Z from the MAF (Mass Air Flow) Sensor to the lower intake manifold. This includes the upper intake plenum and throttle body. Make sure you are careful when removing the upper plenum as there are two coolant lines that attach from the lower intake to the upper plenum. One on the Right (US Passenger) side near the rear of the intake and the other to the throttle body.
Being careful, disconnect all the wiring harnesses from the different sensors on the plenum (IAC, EGR solenoid, TPS, AAC, etc). Mark and label the connectors and vacuum lines as you go.
You will likely need to remove the EGR valve from the intake plenum as it is likely the EGR tube will be frozen and not want to budge. Heating it may help break it free if you do plan on disconnecting the tube from the EGR valve or exhaust manifold.
The upper plenum is held to the lower manifold by 5 hex head bolts under the plenum cover.
Once you have the upper plenum out of the way you can see the fuel injectors. Before doing anything take some rags or tape and fill or cover the intake manifold openings to protect it from collecting anything. Now you can Unclip the fuel injector clips with a pick and pull the connectors off each injector. **Note: Now would be a good time to rewire the injector harness to factory specs as you will notice the injectors all piggy back off one lead per side.
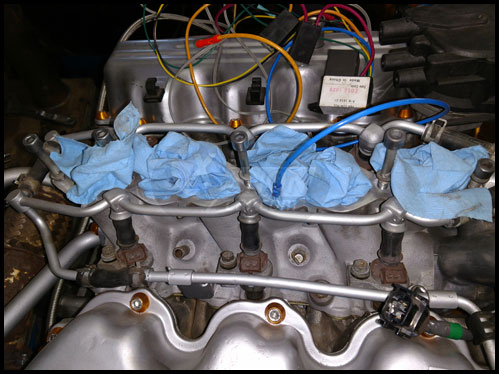
Now that the wiring is out of the way you can remove the Fuel lines from the fuel rail and the FPR Fuel Pressure Regulator and unbolt the two 10mm bolts that hold the regulator onto the lower intake manifold. With this disconnected you can remove the phillips screws that hold the injector hold downs to the manifold and carefully lift the whole rail off the lower intake manifold.
Installation of the turbo injectors are the reverse of removal.
Since you upgraded the injectors to turbo 260cc units you now need to swap the ECU out as well so the fuel injectors and fuel maps match. This is easily done just by swapping the ECU behind right (US Passenger) side kick panel. It is held in by a few 10mm bolts. Remove the bolts and disconnect the connectors. Installation of the Turbo ECU is reverse of removal.
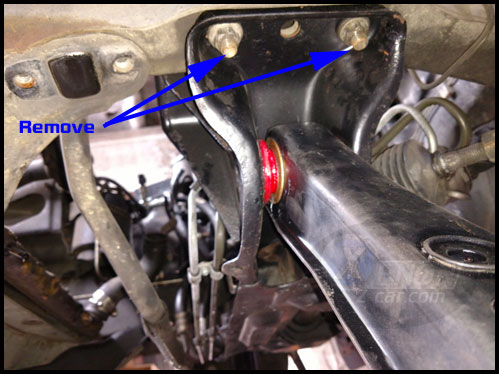
Making room For the Turbo - Crossmember replacement
Replacement of the Front Crossmember is needed if you are not planning on using a turbo Relocation pipe listed above as the turbo sits where the Non turbo left motor mount is located. This is easily done by jacking the car up along the frame rails with the engine removed and then supporting it with jack stands. Next you can remove the four(4) 10mm bolts that hold the power steering and AC lines to the crossmember.
Once these are removed you can disconnect the control arms by removing the 22mm nut and bolt holding them to the crossmember. These could be tight or seized in the control arm bushing so you make need to use some penetrating oil on them.
Now that the control arms are disconnected you can disconnect the steering rack mounts by removing the four(4) 14mm Bolts holding the straps to the crossmember. Make sure you do not mix up the sides as they are different for the shape of the rack bushings.
Finally secure the steering rack on a jack stand so it does not move and then remove the four(4) 17mm nuts holding the crossmember to the chassis of the Z31.
Oil Pan and Oil Feed
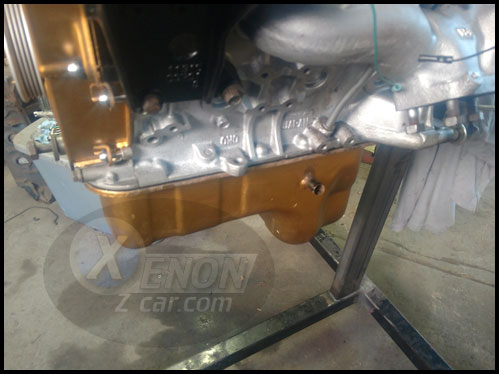
You will need to swap over to a Turbo Oil pan or add a bung on the side of the non turbo oil pan for the turbo oil return. To remove the oil pan, With the engine supported on an engine hoist or stand, Remove the Dip Stick and drain all oil from the engine and then remove the 10mm bolts on the outside edge of the pan. Once all bolts are removed you can use a flat screw driver to break the gasket seal and the pan should come off easily. Just replace with the turbo or modified Oil pan using a new Gasket. Please remember, 08/84-01/87 models use a full oil pan gasket and the later 87 and up models us a 2 piece gasket and black RTV sealant to seal the pan to the engine.
***WARNING: DO NOT INSTALL THE DIP STICK BEFORE INSTALLING THE OIL PAN***
The Z31 oil pan has a guide built in for the dip stick to guide it to the correct location in the sump. If you do not remove the Dip stick before installing the oil pan you will bend the dip stick and it will chewed up by the crankshaft counterweights. This is not good as you will have shards of metal in your oil and it can and will damage your engine.
Now you can remove the plug in the lower front on the drivers side of the engine block. This is where your turbo oil supply line is attached using two crush washers and a banjo bolt. the oil feed line will then bolt right up to the block with the bracket.
You can now also move the driver side engine mount to the turbo location at the front of the left (US Driver) Side Block. You will see two holes just above the oil feed hole you unplugged.
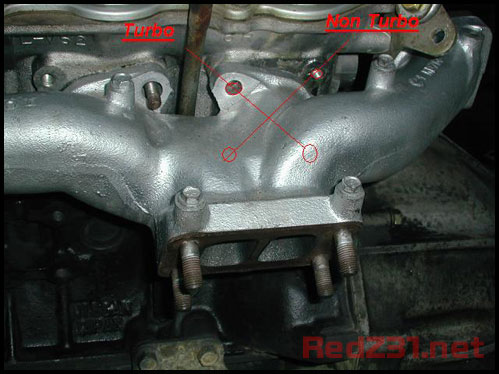
Exhaust Manifolds
Now lets move onto the exhaust manifold as this is the second most needed item to complete the turbo swap. The best thing to do is to use penetrating oil on each Left (US Driver) Side manifold stud and nut to break the bond the rust has on the nut. This Also applies to the two bolts and one stud on the crossover pipe. I know alot of times some of the studs are broken and you will have to remove the broken stud from the head. If this is the case I have had good luck using a reverse drillbit or easy out kit. I usually end up replacing all the studs anyway with the larger 10mm x 1.25 studs by drilling and tapping the heads for the larger studs used on the VG33E Engines Nissan produced.
Once you have the Non Turbo Manifold removed you will notice is the Non turbo placement of Manifold studs differs from the turbo version. Good thing Nissan did drill and tap the heads for the turbo exhaust manifold as well. All you need to do is remove and swap the studs into the correct location.
I recommend using a Victor/Raines brand Exhaust manifold gasket as they are Mult-ilayer steel units. They will hold up better than the fiber type gasket.
So now you have the exhaust manifold installed you can then bolt on the turbo to the manifold. This is also the time you want to install the turbo oil drain as it's easier as you are installing the turbocharger to the manifold. Once the turbo is mounted go and connect the oil feed line on the top of the turbo housing and finally if you are using a water cooled turbo you can attach those lines and plumb them up to the locations at the throttle body and manifold.
Engine Installation and Finishing
Go ahead now and install the engine using an engine lift and bolt the mounts into the new locations on the crossmember. You can then start reconnecting all the wiring, Coolant lines, Heater lines, then install the upper plenum. At this point you have some choices to make like if you are going to run the stock Intake pipes or fabricate an intercooler setup. Also you will need to choose how to complete your exhaust as now the exhaust ends at the turbo elbow. As for exhaust You can contact CM Performance Exhaust and order a kit that bolts right in or fabricate, or even take the car to a local exhaust shop to make a system for you.
Now Fill the engine with fluids (Oil, Coolant) and you should be able to fire it up. You also may need to Make a small change in the idle control wiring if you have issues with idle.
Final Information
There are always a few things that usually are asked when doing this type of swap, I will try to answer them here.
- Will This hurt my Non turbo Motor? Short answer No, as long as you keep boost to reasonable levels with the setup you do you should not have any issues.
- How much horsepower will I make? This will all vary on how you complete the installation. Stock turbo cars made "200hp" at the crank but with the added compression of the NA motor you will likely see more gains especially in the lower RPM band.
- How much boost can I run? Again this will depend on your setup. If you use all the stock plumbing and no intercooler I would not run more than the stock boost level of 8psi on the T3 turbo as this is where the stock wastegate is sprung for. Adding a boost controller is not recommended unless you add an intercooler and then 15psi would be about max on the stock T3 unit.
- Will My Car be legal? As long as you build the car to meet your local emissions laws you wouldn't have any issues with being legal. Remember these cars all fall under the classic car status so many places do not require emissions any more.
- Can I run AC and install a intercooler? this all depends on if you can fabricate. If so you can route the plumbing out of the way of the AC compressor and have the best of both worlds Like the Spearco Intercooler system was designed.
Sources used on this page:
- Written By: Joseph Melnick (XenonZcar)
- Manifold Stud Image from: Redz31.net