


Cassette deck refurbishing in your 280ZX

Has the cassette deck in your 280ZX gone kaput? Have no fear — you may be able to fix it yourself! In my experience, about 75% of the time, a “bad deck” is only suffering from rotted, broken, or melted belts. This is an easy fix!
Note: These instructions are based on a 1982 280ZX Turbo coupe.
Safety Tip: Before performing any electrical work on your car, disconnect the negative battery cable.
STEREO CONSOLE REMOVAL
- Remove the knee guards under the dash on both the driver and passenger sides. Each is held in place by two screws.
- Unscrew the two small panels at the base of the stereo console — one on each side (driver and passenger).
- With those panels removed, you’ll see four bolts on each side (top and bottom) of the stereo console. Remove all eight bolts.
- Engage the parking brake (or block the wheels). For automatics, move the shifter all the way down to 1st gear. For manuals, place the shifter in Reverse.
- Carefully slide the entire stereo console out. Disconnect the antenna cable to gain more room. Leave the stereo attached to the large main cable — there’s no need to remove it.
- Locate how the cassette deck is mounted to both the console and the AM/FM receiver. You can easily remove the larger beige cable from the receiver. However, there’s a single blue cable that may be difficult to disconnect — if it won’t release, it’s safe to cut it and later reconnect using a standard wire nut.
- Remove the screws securing the cassette deck to the stereo console, then lift the deck out.
CASSETTE BELT REPLACEMENT
Now that the cassette deck is out of the stereo console, it’s time to open it up and replace those worn-out belts.
- Remove the screws securing the top cover of the cassette deck. These can be tight — use care to avoid stripping them.
- Remove the faceplate (three screws).
- Flip the deck over and remove the bottom plate to access the belt area.
- Locate the two large wheels and the small metal plate above them. Remove the two screws holding the plate to gain full access to the belts.
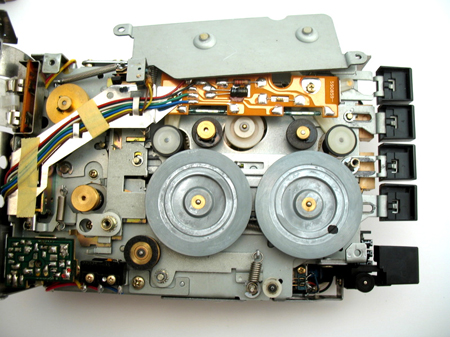
- Inspect the belts. Common issues include broken belts, stretched belts, or belts that have turned to mush. Order replacements — there are five belts in total.
Recommended source: Studio Sound Electronics
Use square belts in the following sizes:
- RED — 4.0" × 1.2mm (SBS4.0)
- GREEN — 12.4" × 1.2mm (SBS12.4)
- BLUE — 6.0" × 1mm (SBO6.0)
- PURPLE — 4.6" × 1.2mm (SBS4.6)
- YELLOW — 3.2" × 1mm (SBO3.2)
Here’s the belt diagram (faded belt sections indicate hidden routing points):
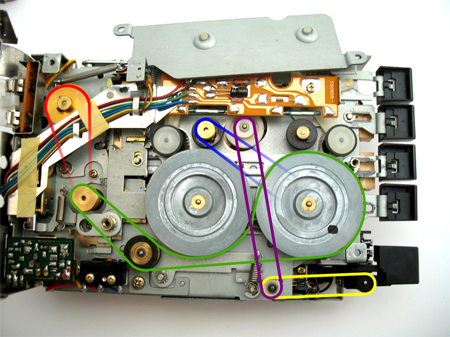
The green belt may feel slightly loose, but it still works fine. These belts cost around $1 each and typically arrive quickly.
Once all belts are replaced, simply reassemble the cassette deck by reversing the disassembly steps.
Sources Used
- Written by: maalsa of Zcar.com
- 1979-1983 280ZX Nissan Factory Service Manuals