


Z31 Heater Core Replacement
Ok, here is the deal. You come out to start your car and you find a puddle on your passenger floor board. Your windows are full of condensation and you smell anti-freeze. Well your heater core just bit the dust. This is not a hard thing to fix but a time consuming item to fix. I replaced my leaking core in about 5 hours.
Items you will need
- #2 Phillips screwdriver
- #3 Phillips screwdriver
- 3/8" ratchet
- 2 small flat head screwdrivers
- 10mm socket
- 13mm socket
- 19mm socket
- 3" long extension
- Steering wheel puller (Optional)
-
Heater Core
- Nissan Part #27140-01P00
- Autozone Part #399386
- High temperature foam weather stripping
- High temperature silicon sealant
- OE firewall gasket (If needed) (Nissan Part# 92565-01P00)
Other Items You may want to replace
- Actuator 1 (mixing box) – Nissan Part #27731-01P10
- Actuator 2 (mixing box) – Nissan Part #27731-01P10
- Actuator 3 (near fan housing) – Nissan Part #27730-01P00
- Water Hose 1 – Nissan Part #92410-01P00
- Water Hose 2 – Nissan Part #92400-01P02
- Water Hose 3 – Nissan Part #92406-01P04
- Water Hose 4 – Nissan Part #27144-01P00
- Water Hose 5 – Nissan Part #27146-01P00
- 6 Clamps – Nissan Part #08723-12800
There may be other items but this is the basics.
Removal of the Heater Core
The first thing to do is to remove the steering wheel and dashboard . Now start by removing the vent tubes, starting with the defroster venting at the top of the dash. There are 2 screws holding it in on the driver side door vent.
Next, move to the lower driver side vents. There is one 10mm nut holding these two vents to the dash support. Undo this and then remove the one screw holding the door vent tube together to the door vent and pull them out.
Now on to the passenger side floor vent. Remove the one screw that holds the two-part vent together and pull out.
Next is the passenger side face vent. There will be a 10mm bolt that holds this in on a bracket. Remove the bolt and remove the vent tube from the car.
The next vent to remove is the center manifold. There is a Phillips screw that holds this to the heater core box. It is on the underside near one of the vacuum actuators. Remove the screw and pull the manifold far enough to get to the actuator and remove the screws to it. Now pull the vent out of the car from the top.
All this is just to see the heater core.
Now that we can see the heater core box, we need to make room to pull it out from the car. First is to remove the dashboard supports at the center of the car. There are two bolts and two nuts per side, all 10mm. Remove these and set aside.
Next we need to drop the steering column. Remove the two 13mm bolts. These are hard to see as they are recessed into the dash support. Use a small socket on a wobble and a short extension to get these out.
Once the steering column is dropped, remove the wiring harness mounting clips and unplug the harness at both edges of the cross member. Next, remove the harness.
Now you can remove the remaining 3 bolts on each side of the dashboard support and pull the support out of the car.
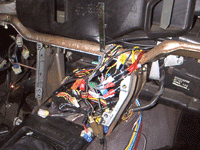
On the heater core box, you will see a few vacuum lines coming to it. Unplug them and mark so you know where each came from. One is from the vacuum canister under the hood and the other is from the floor vent switch on the driver side kick panel.
The heater core box is held in by two 10mm bolts and two Phillips head screws. The screws are very hard to remove as they are hard to get to with enough force to break them loose. The bolts are much easier. Remove all 4 of these, then undo the clamp screw that holds the core box to the AC box. Once this is done, move under the hood to disconnect the coolant lines.
The last thing for removal is to disconnect the coolant lines. Once these are disconnected, pull the heater core box out of the car and set it on a workbench.
Installing the New Core
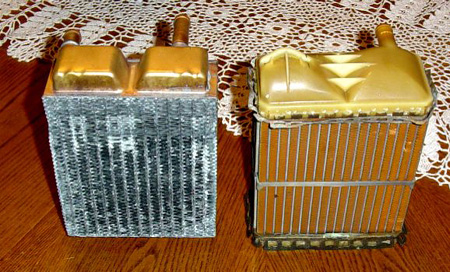
OE heater cores are expensive and becoming difficult to get a hold of. I used an aftermarket Autozone heater core (part #399386). The heater core is held into the heater core box by a small plastic bracket with two screws in it. Remove these screws and pull out your old core. Be careful, as some coolant may still be in the core.

As you may notice, the two cores may not be exactly the same size. This is because the aftermarket cores are designed to fit other vehicles as well as the Z31.
When installing the new core into the heater core box, you will want to apply some high temperature foam weather stripping to make the core fit correctly.
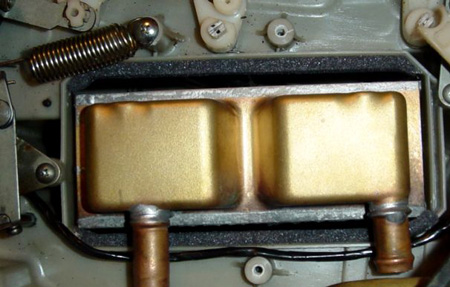
Here’s a view of the assembled box. I installed new hoses and clamps. Additionally, the OE firewall gasket was replaced prior to installation.

Sources Used
- 1984-1988 Nissan 300ZX Factory Service Manual
- Images provided by: Redare and Chris86NA2T
- Video By: XenonZcar