


Z31 Hood Scoop Install

If you have a non-turbo or a 1986–1989 300ZX that did not come with a stock hood scoop and would like to add the 1984–85 turbo scoop, or if you have a 1987–1989 and want to add the sleek 200ZR scoop to your car, the following write-ups will help you do the install correctly.
1984-1986 300zx Turbo Scoop
Tools Needed
- Measuring Tape
- Permanent Marker
- 10mm Socket
- 12mm Socket
- Ratchet
- Drill
- Drill Bit
- Body saw / Cutoff wheel
- Brush-on Primer
Action Needed
- First, start off by removing your hood. Have a helper hold the hood while removing the hood shock mounts. There are 2 styles: one is a bolt-on with a 10mm bolt on each mount; the other has a ball stud. To remove these, unclip the hood strut and pull off the ball stud. At this point, you can then remove the four (4) 12mm bolts at the hood-to-hood hinge.
- Next, set your hood on a level surface. Use a set of body/fender stands to hold it, as foam padding will prevent scratching the paint.
-
Now lay out your holes and cutting marks as shown below.
- Once cut, seal the bare metal with a brush-on primer to protect the hood from rust.
- Now mount the scoop to the hood.
- Install your hood back on your car. Installation is reverse of removal.
1987-1989 200zr Scoop Install

In 1987 the Z31 had many small body changes, becoming more rounded and less sharp. One of the nicer updates was the Japanese 200ZR hood scoop, redesigned to be smaller and more blended into the hood compared to earlier models. Many people like this look and add the scoop even if they don't have a 200ZR. Here is how it can be done.
Items Needed
- Measuring Tape
- Permanent Marker
- 10mm Socket
- 12mm Socket
- Ratchet
- Drill
- Drill Bit
- Body saw / Cutoff wheel
- Brush-on Primer
- 1 paper hood hole template
- 4 rubber mounting washers
- 4 flange nuts
- 1 × 44" x 1/8" rubber gasket
- 2 × 2" x 1/2" rubber strips
- 2 × 1/2" x 8" rubber strips
Marking the First Hole Location
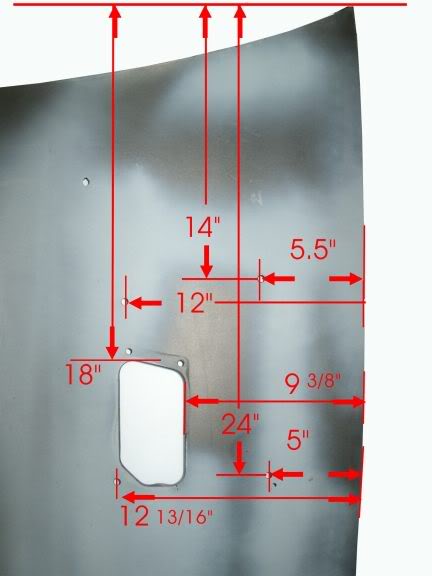
It is best if you remove the hood from the car. Place the hood on two saw horses or a stable surface. Measure across the top of the hood starting 5.5" below the corner. The hood should measure 52 7/8" wide. Mark the midpoint at 26 7/16" using masking tape. At the front, between the headlights, measure 30" wide and mark at 15". Stretch tape from your top center mark to the front mark—this defines the hood center line. Double-check your measurements at several points. The first hole drilled will be used to locate the template.

The above picture shows where to drill this hole: 9" down and 2" in from the center. Center punch this spot and drill a pilot hole using a sharp 1/8" bit.

Locating the Template
There are two ways to attach the template for cutting: Use 3M contact aerosol spray (light coat on both surfaces) for easy removal, or use double-face tape. Place the template by aligning the 1/8" pilot hole in the hood to the corresponding hole on the template. Align the template’s left edge parallel to the center line tape. Double-check the placement before cutting.
Cutting the Hood and Drilling the Holes

Drill holes as indicated on the template, avoiding the underside bracing (the 87–89 hood was designed to accommodate the 200ZR scoop). If you hit a brace, re-drill in a new spot. The images show placement as if viewed from the underside. Note the notch Nissan placed in the brace for the scoop mounting.

Using a hand jigsaw with a metal-cutting blade or a die grinder with a cutoff wheel, cut along the inside of the template line (remove the crosshatched area). Do not cut bracing. You should end up with a hole as seen below.


Test fit the scoop to check alignment. If necessary, widen the bolt holes for proper fit.
Installing the Scoop
After painting the scoop, apply the 1/8" by 4' rubber gasket to the groove on the underside. Place the round washers on the mounting studs. Apply the 8" × 3/8" strips to the bracket top surface where it meets the hood to strengthen and prevent vibration. The 2.5" × 1" strips wrap around the odd-shaped "W" areas as shown:

Instruction Document
Though he is no longer producing these scoops, Gary Molitor has given us permission to provide his install document for assistance in installing stock or other manufacturers' scoops. The document is a PDF file.

Sources Used
- 1984-1988 Nissan 300ZX Factory Service Manual
- 300zx turbo scoop Images by onefast87
- 200ZR scoop instructions and template provided by: Gary Molitor