


XenonZcar.com - Z31 Dashboard Removal
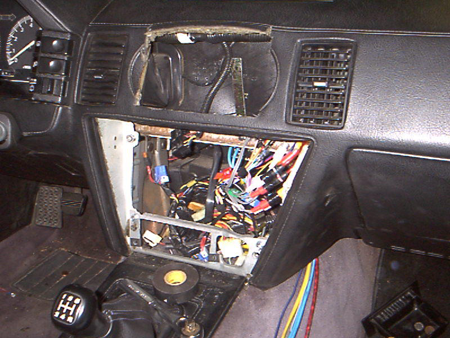
When I had to replace my heater core as it was leaking, I learned that I would need to remove the dashboard. I thought to my self this will take forever but it was not that hard to do and only took about one hour. Below is the steps I took to pull the dash.
Click to Enlarge
*WARNING* - Do this modification at your own risk. We Are not responsable for any issues of your own doing.
Tools Needed
- Regular 10mm socket
- 19mm socket
- Socket driver or Ratchet
- 3" extension
- #2 Phillips screwdriver
- #3 Phillips screwdriver
- 2 Small flathead screwdrivers (One with a slight Bend is best so break out the old one and bend it up)
- Steering wheel puller
Dashboard Removal Procedure
-
Remove the stereo and heater control assembly:
- Pull out the ashtray.
- Remove the 4 stereo/climate control trim screws:
- 2 screws behind the ashtray.
- 2 black screws on top (use 10mm socket if tight).
- Pull the trim out, disconnect cigarette lighter and ashtray lights, and remove the trim.
- Remove the 4 stereo/climate control mounting screws (10mm).
- Pull the stereo and climate control assembly out in one piece, disconnect connectors, and remove.
- Locate and remove the 4 screws holding the dash to the mounting plates.
-
Remove the driver-side lower dash cover:
- Remove 3 screws holding it in place.
- Pull the trim down and disconnect the foot light.
- Unplug driver's side dash harness and remove retaining screw.
- If digital dash: remove nut/bolt holding power supply, unplug, and remove the supply.
-
Remove the steering wheel column covers:
- Remove 4 Phillips head screws:
- 2 outer screws hold the halves together.
- 2 inner screws hold the cover to the combo switch.
- Remove the key light connector and free the cover.
- Be careful not to crack the cover when removing over the cruise control switch (GL models).
- Remove 4 Phillips head screws:
-
Remove the steering wheel:
- Pry off the horn cover:
- GL: start at the top and pull.
- GLL: pry from the bottom.
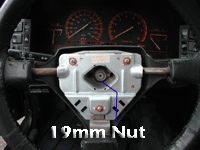
- Remove the 19mm nut holding the wheel.
- Use a puller or loosen nut 3 turns and rock wheel to free it.
- Pry off the horn cover:
-
Disconnect harnesses and remove column switches:
Loosen the single Phillips screw, disconnect connectors, and remove switches off the shaft.
-
Remove passenger-side lower dash cover:
- Remove 2 screws at the bottom of the panel.
- Pull trim down and disconnect foot light.
- Remove plastic clip and screw to access passenger kick panel and harness connectors.
- Disconnect harness connectors and remove the lower dash bolt (10mm).
-
Remove upper dash windshield vents:
- Use small screwdriver to push metal tabs and pry vent up carefully.
- Remove 4 screws across the top of the dash (10mm socket).
- Be careful not to hit the windshield.
-
Remove the dash:
Carefully pull the dash out and away from the steering column, ensuring all connectors are unplugged.
- For 84–86 analog dashes: disconnect the speedometer cable first to avoid breaking the clip.