


S30 Rear Disk Brake Install
Rear Drum to Disc Brake Conversion
You're at a car show, admiring your Z's fresh wheels… but then you glance at the rear and spot those outdated drum brakes peeking through. Not exactly the look (or performance) you want. Let’s fix that — improve your stopping power and give your Z the sleek, modern look it deserves.
There are plenty of rear disc conversion guides out there, but like with most custom work, there’s more than one way to get the job done. This is just another approach — straightforward, effective, and aimed at keeping the process clean and simple.
*WARNING* - Do this diagnosis/mods at your own risk. We Are not responsable for any issues of your own doing.
Items Needed
- Z Race Products rear disc conversion brackets
- New 1982–83 ZX calipers and rotors (order them complete with their own mounting brackets)
- New caliper mounting hardware (M10x1.25 bolts, 30mm long, plus washer & lock washer)
- New brake line — conversion from
M10x1.0 flare nutto brass-washer-styleM10x1.0 fitting - M10x1.0 washer-style (male) to 3/8-24 flare nut (female) adapters
- 3/8-24 to M10-1.0 solid brake line (both male flare nut, approx. 8" length)
Rear Tear-down
- Remove the wheel and drum.
- Remove drum brake hardware (shoes, springs, etc.). The wheel cylinder is optional to remove depending on your cutting method.
- Remove the outer-most solid brake line so it does not get in the way if you plan to cut off the backing plate. Plug the open brake line hole temporarily.
- Remove the 4 bolts holding the backing plate. (Penetrating oil like PB Blaster helps here.)
-
Remove the backing plate by either:
- Removing the stub axle
- Or cutting it off with a Sawzall (backing plate is thick—about 1/8"–3/16")
- Clean up Sawzall shavings with a brush and/or vacuum.
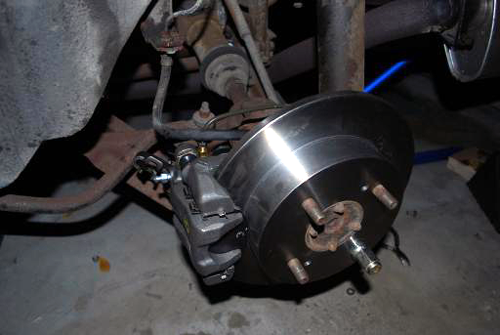
Rear Rebuild
- Install the Z Race Products bracket with supplied hardware (
M10x1.25, 25mm), positioning the caliper toward the front of the car. - Install the caliper temporarily, ensuring the bleeder screw is positioned at the top.
- Bend the new solid brake line and fittings to fit your application (refer to reference photo if available).
- Remove the caliper.
- Install the rotor. Tip: Use one lug nut temporarily to hold the rotor in place.
- Reinstall the caliper and connect the brake lines.
- Bleed the brakes according to the Factory Service Manual procedure.
E-brake
E-brake install is soon to come with an update!
Sources Used
- Writeup and photos by: Headstrong77 of Zcar.com