


XenonZcar.com - Upgrading your EFI in your 280ZX to Z31 style
Purpose
The 81-83 Datsun 280ZX Turbo (S130) and 84-89 Nissan 300ZX Turbo (Z31) both use Nissan’s ECCS fuel injection system. The Z31T ECU is virtually plug & play into the 280ZXT EFI harness with a few quick wiring changes. Benefits of this upgrade include: updated fuel and ignition timing control, less airflow restriction, option to use NIStune, PocketROM, JWT, AFC or similar aftermarket programmable ECU controls, ECU diagnostic codes, wiring fixes, and more. This swap alone will only add about 10hp, but it eliminates the troublesome AFM and wiring bugs of the 280ZXT. Running with a boost controller and intercooler, the Z31T ECU will really make big improvements.
The Z31T had several EFI changes throughout its production that may affect your installation procedure. Details will be discussed below, but be aware of ECU high/low impedance, O₂ sensor type, and internal circuit boards. Before attempting this swap, read these steps many times to become familiar with the nomenclature. Also print out and study the wiring schematics.
⚠️ WARNING – Do this diagnosis/modification at your own risk. We are not responsible for any issues or damage caused by your own work.
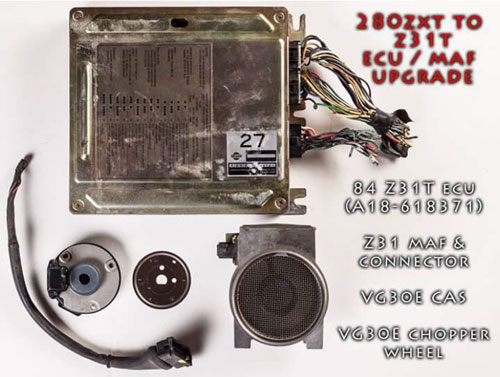
Parts Needed:
- Any year Z31 MAF (Mass Air Flow Sensor). Yellow sticker = Federal, blue sticker = California
- 84–85 Z31T ECU is direct plug & play, 86–87T requires Titania O₂ sensor, 88–89T is high impedance and requires Titania O₂ sensor
- Any year VG30E(T) or VG33E distributor encoder disc (chopper wheel). Recommended to use its associated CAS (Crank Angle Sensor) as the 280ZXT’s is only gel-covered
- Any year Z31 ECU and MAF plugs (CA emissions MAF only has 5 pins)
- Several spools of automotive wire
- Soldering kit
- Wire heat shrink and electrical tape
- If using 86–89T ECU: Titania O₂ sensor
- If using 88–89T ECU: Six drop resistors (6.8 ohm / 10 watt). 81T already has drop resistors
- 81T needs the 82–83T distributor and shaft
Procedure:
Wiring colors: B = black, G = green, L = blue, R = red, W = white, Y = yellow
ECU Plugs: Pinout with Marked Changes
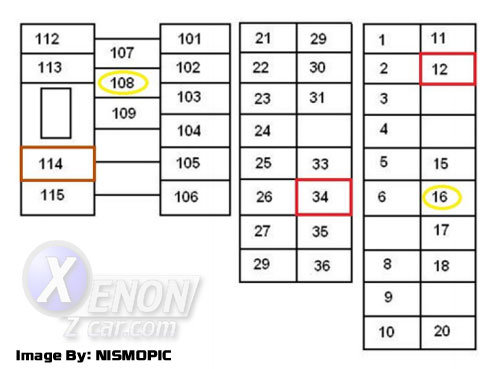
Connecting the ECU
- Insert new wire (from Z31 ECU plug) into empty pin 12 of ECU connector, then cut wire 33 Y/L with several inches of wire. Attach to new pin 12 so it connects to 12 R/W wire on the MAF (marked as F). Z31T ECU pin 33 is not used; tape it off.
- Insert new wire into empty pin 34, connect to a new wire going to 12v switched power (27 / 35 B/W from fuel pump control module sub harness).
- For 81T harness, insert new wire into empty pin 114, connect to direct battery power (fused).
Connecting the Air Regulator
- Cut pins 108 B and 16 L/R from the ECU connector with several inches of wire.
- Connect harness side of 108 to ECU pin 16. This lets the Z31T ECU control the air regulator from ECU pin 16.
Connecting the Fuel Pump Relay (FPR)
- Connect harness side of pin 16 L/R to 12v switched power (27 / 35 B/W from fuel pump control module sub harness).
- Locate the green FPR under dash (remove glove box or dash for access). Cut black wire before the FPR and connect relay side of the wire to a new wire running to ECU pin 108. The ECU now controls the FPR ground.
Connecting the MAF
- MAF Position A/wire 30 Y/G → 30 Y/B on 280ZXT harness.
- MAF Position B/wire 31 B → 31 Y/R on harness.
- MAF Position C/wire B → body ground.
- MAF Position D/wire 26 B → 26 B on harness.
- MAF Position E → 27/35 B/W (V.C.M solenoid power source).
- MAF Position F/wire 12 R/W → 33 Y/L on harness.
Distributor Modification (CAS Wheel)
- Remove distributor cap and rotor.
- Remove Phillips/Flathead screw under rotor.
- Remove rotor mount and 280ZXT encoder disc.
- Install new encoder disc with number stamp UP.
- For 81T, swap to 82–83T distributor (see swap guide).
Dropping Resistors
For 1984–1987 Z31 ECU on a 1981 S130, remove stock resistors from driver kick panel. Either jumper them or connect all 7 wires together. Do NOT bypass resistors for 88–89T ECU. If using 88–89T ECU with low impedance injectors, add six 6.8 ohm 10 watt resistors inline.
Fuel Pump Control Module
Z31T ECU controls FPR ground internally. Remove FPCM and tape up connector. (81T does not have an FPCM.)
AAC and EGR Controls
Z31T ECU does not control these systems. Leave actuators in place but non-functional. Remove VCM solenoid and cap vacuum lines. Adjust throttle body stop screw if AAC is removed.
Knock Sensor (Detonation Sensor)
Z31T ECU uses a different signal. Disconnect sensor wiring near oil filter and tape it up.
O₂ Sensor and Wiring
Match sensor type to ECU. Use ECU lookup tool to confirm.
Titania O₂ Sensor
Use an 18mm–12mm adapter or weld M12x1.25 bung. NGK 24007 available online.
- Black wire → ECU pin 24.
- Red heater wire → switched 12v power.
- White heater wire → ECU pin 115.
Sources Used
- Scanned by: Joseph Melnick (XenonZcar)