


Z31 Automatic to Manual Transmission Swap
These instructions are based on swapping the A/T from an 89T for a 5-spd from an 88T. It will work very well for pre 87 cars except for the electronics. Some of the stuff is for turbo cars only and I'm sure you'll find out as you do the swap.
*WARNING* - Do this diagnosis/mods at your own risk. We Are not responsable for any issues of your own doing.
Transmission Specs
| Category | Model / Notes |
|---|---|
| Manual Transmissions | |
| 84–89 Z31 NA | FS5W71C — Nissan 5spd (medium) |
| 84–86 Z31 Turbo | FS5R90A — Borg Warner T-5 5spd (weakest) |
| 87–89 Z31 Turbo | FS5R30A — Nissan Turbo 5spd (strongest) |
| Automatic Transmissions | |
| 1984 only | 4N71B |
| 1986–89 | E4N71B |
| A/T Model Code Number | |
| N/A | X8203 |
| Turbo | X8206 |
| Torque Converter Assembly | |
| N/A | GXA |
| Turbo | G |
Advice Before Starting
- Download and read the AT and MT sections of the Factory Service Manual .
- Make every attempt to get a transmission from the same model car, otherwise you will have to modify the drive shaft flange for it to fit correctly as the early 1984-1986 cars have a different Differential Flange then the 1987-1989 years. More infomation about the Differentials and Driveshafts can be found by clicking the links.
- Whenever you take a part out, reinsert the retaining bolts whenever possible so you know where everything goes during reassembly.
- If you have a friend who is willing to help, get them. The job is much easier and faster with two sets of muscles in place.
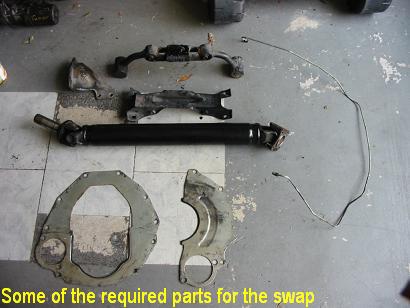
Parts You Need
Many parts can be salvaged from a junkyard, but some should be purchased new for safety and reliability.
Essential Tools & Supplies
| Item | Notes |
|---|---|
| Basic tool set | Wrenches, sockets, large wrenches |
| Flare nut wrench | For brake/clutch lines |
| Transmission fluid | Correct type for Z31 manual |
| Brake fluid | For clutch hydraulics |
| Clutch alignment tool | Required for install |
| Transmission jack | Rentable, safer than floor jack |
| Jack stands | Raise car safely |
| FSM pages / fiche | Critical reference |
| Transmission rear oil seal | New recommended |
| Engine rear oil seal | Replace while accessible |
| Moly grease | For seal installation |
| PB Blaster or WD-40 | For rusted bolts |
| Anti-seize compound | Thread treatment |
| Thread locker (medium) | Torque-critical bolts |
Parts from Donor 5-Speed Z31
| Component | Notes |
|---|---|
| 5-speed Transmission (complete) | Include all switches, shifter, bolts |
| Dust plates (2) | Attach to engine/trans |
| 5-spd driveshaft | Must match transmission and Differential |
| Flywheel + bolts | Check wear; resurface or replace |
| Speedometer cable | Depends on analog/digital dash |
| Speedometer pinion O-ring | Replace with new |
| Transmission mount & crossmember | Inspect rubber |
| Clutch + brake pedal assemblies | Swap both |
| Clutch master & slave cylinders | Buy new |
| Clutch dampener & hydraulic line | From donor |
| Front down pipe (5spd) | Donor pipe preferred fit |
| 5-spd ECCS (ECU) | Ensure proper engine map though you can use the Automatic ECU with the Manual transmission the idle may need adjusted |
| Clutch pressure plate | Buy new preferred |
| Clutch pilot bushing | Press in new |
| Throw-out bearing | New recommended |
| Misc. bolts, clips, washers | Take everything from donor |
Before you start
If you are using a parts car Flywheel, You should Have a shop resurface the flywheel if needed.
You will also want to Verify all needed parts and supplies before you get started. Either way you will likely need to get other items that you either forgot to get or lost/broke while doing the swap.
You should also Clean the 5-spd unit as best as you can.
- Drain all oil out of the transmission.
- Replace the rear transmission oil seal.
- Replace the throw-out bearing.
- Apply grease to the clutch fork.
- Inspect the rubber boot; replace if worn or damaged.
- Check neutral and reverse light switch wires for damage; replace switches if wires are frayed.
- Inspect the transmission mount and cross member. If the rubber is cracked or worn, replace both.
Begin Work
The first thing to do is to Disconnect the battery and move it out of the way. You will need this to access wiring later on.
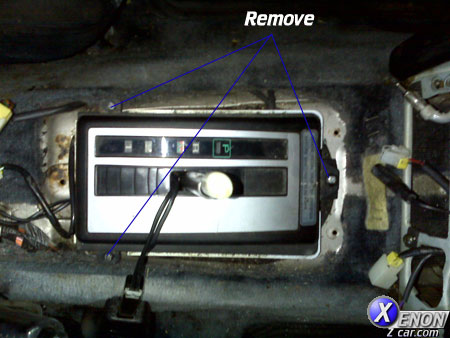
Take out the center console
See fiche section 7E12: or Section 11 Sub Section 21 of the Haynes manual.
There are a couple of bolts behind the "300ZX" plate on the center console and a few more in the console box.
Take out the A/T shifter
See fiche section 4J08:
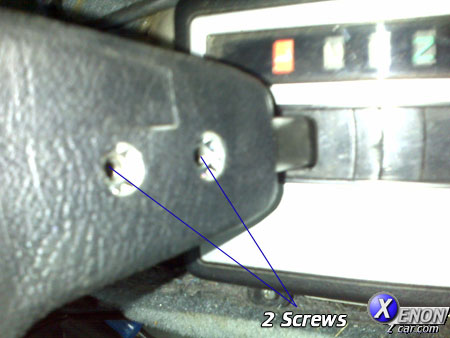
Remove the 2 screws on the back of the shifter
Now remove the 3 screws holding the cover to the shifter plate

Disconnect the two harnesses that are sometimes deep into the driver side Transmission well carpet.
You'll also need to disconnect the shift link mechanism from under the car. I did this later when I jacked up the car.

Install the brake pedal
I started with the most difficult step - replacing the brake pedal (see fiche Section 4L05).
- Disassemble your A/T brake pedal only from it's mounting by removing Brake Booster rod and the piviot Pin from the assembly
- Disassemble the 5-spd pedal from its plate (keep spring/shaft)
- Start putting the pedal in. A royal PITA to align the pedal shaft while trying to maintain the spring in position in order to bolt her in place -you'll see what I mean when you get there. PATIENCE, A LOT OF IT, and it'll eventually get in. I used a rope to pull the spring compressed, then with a guide pin at the other end of the bore for the brake pedal shaft (item #46582), I was able to get it in. Torque tightening bolt to 22-30ft-lb
Install the clutch pedal assembly
The clutch pedal assembly includes the pedal itself, its mounting bracket and the clutch master cylinder.
- If using the old master cylinder, make sure to clean it thoroughly.
- Take out the windshield washer fluid reservoir and on the firewall you'll see a plate bolted where the clutch pedal shaft will go through.
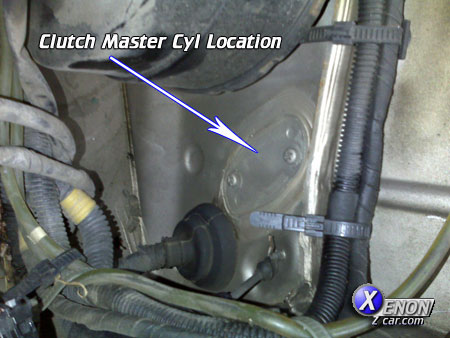
- Take that plate out
- Install the clutch pedal and master cylinder
- Torques: Clutch master cylinder securing plate: 5.8-8.7ft-lb; Clutch pedal push rod: 5.8-8.0ft-lb; Clutch pedal lock nut:12-16ft-lb.
- Don't install the clutch hydraulic line at this point as there is not enough room yet.
Automatic Transmission Removal
Geting the Car Preped
Raise the car up as high and as safely as possible and USE JACK STANDS to support the car. You have to raise it high otherwise the Transmission dip stick tube will not clear frame when time comes to remove transmission.
NOTICE! Never work under car without properly securing jack stands under the vehicle.
From here on, we'll start taking out bolts. You will break some (especially those in the exhaust area) so be prepared to purchase new ones.
Tip: Spray all exhaust bolts with solvent (PB Blaster, WD-40, etc.) and let soak overnight. These bolts often break, so prep well!
Disconnect the drive shaft at the differential side. Rotate the wheels to access all bolts easily.
Transmission Preparation & Exhaust Removal
Preparation Steps
Exhaust Component Removal
Remove Drive Shaft & Transmission
Replacing Rear Oil Seal, Flywheel, and Clutch Assembly
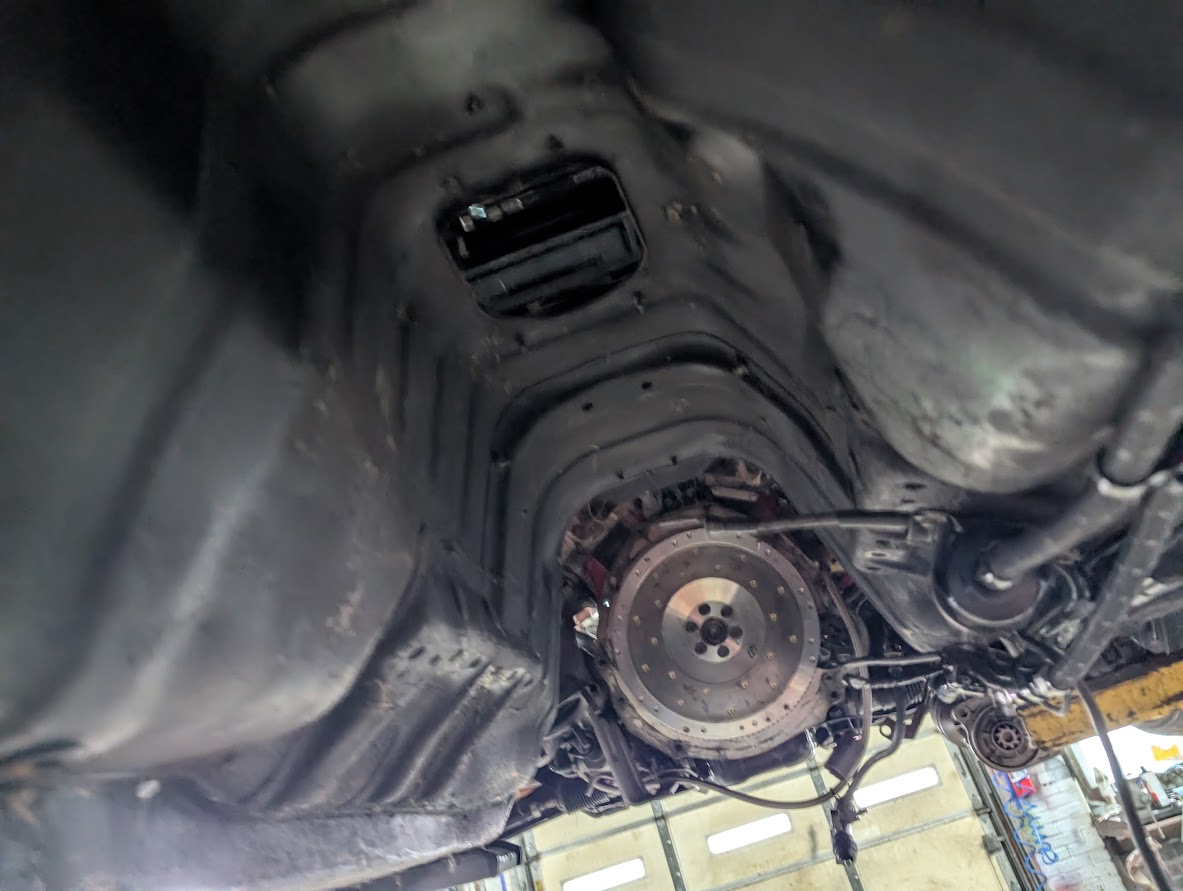
Once the A/T is removed, you'll see a flex plate and a steel ring where the converter sat. Removing this ring is the next challenge (second only to the brake pedal). Options:
- Use a puller (AutoZone or Harbor Freight rent them)
- Use a wrench to pop it loose
- Socket + grease pressure method
- A blind side puller also works well
- Remove the small circular drive plate and flex plate.
- Replace the rear oil seal on the engine. This is likely your only opportunity—don’t skip it.
- Install the clutch hydraulic tube, slave cylinder, and damper. Use a flare nut wrench and follow torque specs precisely.
-
Torque Specs:
- Damper bolts: 5.8–8.0 ft-lb
- Slave cylinder bolts: 22–30 ft-lb
- Press the brass pilot bushing gently into place. Leave clearance to allow future removal; don’t bottom it out.
-
Insert the dust plates:
- Small one first (toward engine)
- Full one next
- Align with dowel pins; can be reinserted later if needed
- Install the resurfaced 5-speed flywheel. Bolt the Flywheel to the crankshaft using blue Lock-tight on the bolts (Torque: 72–80 ft-lb).
-
Bolt the clutch plate assembly in this order:
- Clutch pressure plate (next to flywheel)
- Clutch disk
- Use a clutch alignment tool for accuracy
- Torque the flywheel bolts: 16–22 ft-lb again with blue Lock-tight on them
Installing 5-Speed Transmission
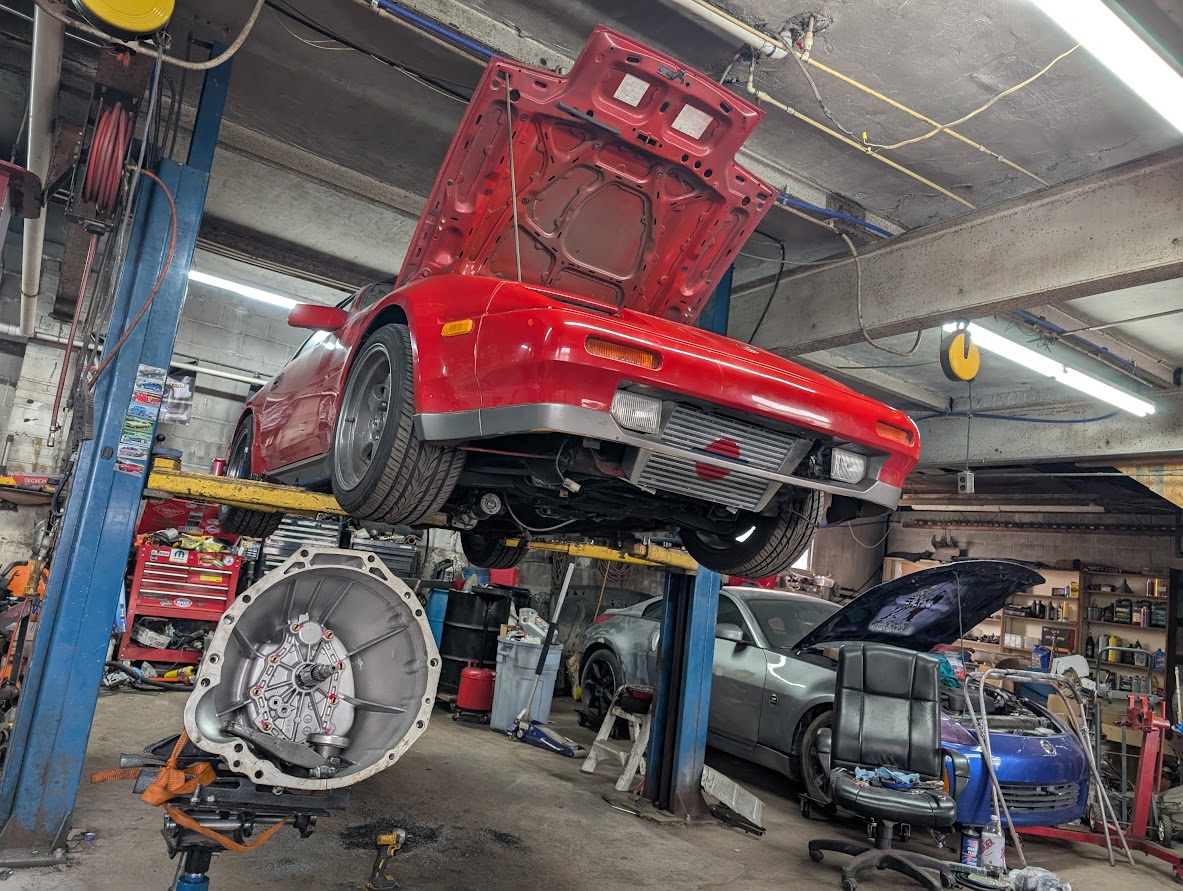
You've cleaned and prepped the 5-speed transmission. Place it on the transmission jack and slide it under the car. Follow these steps carefully:
- Align the transmission input shaft to the driveshaft. It may connect easily or take hours. Be patient and do not force it.
-
Once aligned, bolt the transmission to the engine.
- Bolts below the starter: 22–29 ft-lb
- Top bolts: 29–30 ft-lb
- Don't forget to reinstall dust plates and follow earlier alignment tips
- While the jacks are still supporting the engine and transmission, install the crossmember and transmission bushing. Torque: 33–44 ft-lb (based on engine mount specs)
- Reconnect the oil temperature sensor harness.
- Reinstall the starter and reconnect the negative battery terminal.
- Reinstall the driveshaft using correct torque specifications.
- Reinstall the exhaust components. Note: If using a turbo front tube, modify heat shield with a wooden mallet to clear the mount.
- Install the original speedometer pinion with a new O-ring.
- Torque the 5-speed driveshaft to 29–33 ft-lb.
-
Final exhaust torque specs:
- Front tube to engine: 34–45 ft-lb
- Front tube to catalytic converter: 23–32 ft-lb
- Cat to mid tube: 31–42 ft-lb
- Adjust the emergency brake. Torque: 2.3–3.2 ft-lb. Aim for 8–10 notches before full engagement.
Fill Her Up With Oil
There are several ways to fill the transmission with oil. One common method is threading a plastic tube from the engine bay to the transmission oil inlet, then pouring in: 5-1/8 qt of Redline MT-90 synthetic (or 4-1/4 qt for N/A). You'll know it's full when oil starts to drip out of the fill port.
- Fill the clutch master cylinder with DOT-3 brake fluid and bleed the system. Start with the damper, then the slave cylinder. A friend helps a lot here!
- Adjust free play in the brake and clutch pedals as precisely as possible.
Electronics
Now that the hard part is done, wiring is next:
- Reinstall the front tires.
- Don’t lower the car just yet—you may need to go underneath again.
- You'll need to work with the inhibitor switch (8-pin connector) from the transmission that leads into the battery area. You should've disconnected and noted this earlier.
Refer to the following for 1987–1989 cars only:
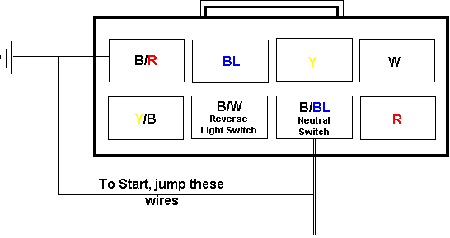
- Looking at the inhibitor switch from the transmission side (not engine side).
- To enable starting, jump the
Black/Blue (B/BL)wire with theBlack/Red (B/R)wire. - For clutch-start and cruise control functionality, make this jump at the clutch switch. You may need a universal clutch switch.
- For reverse lights, connect the blue wire from the reverse light switch to the
B/Wwire and the black wire (ground) to theB/Rwire on the inhibitor switch.
Refer to the following for 1985–1986 cars only:
- Find the 8-pin connector near the battery. You only need:
Red/Black,Black/Yellow, andBlack/White. - Ground the
Black/Yellowwire by connecting it toRed/Black. Note: grounding this disables cruise control unless routed through the neutral switch. - To preserve cruise and proper start logic, connect both to the neutral switch on the 5-speed transmission.
- For reverse lights, connect
B/RandB/Wwires to the reverse switch. - Hook up the clutch pedal’s switch to the unused clutch harness to ensure cruise disengagement works properly. Check nylon bumpers!
- If no neutral switch: install a hidden switch in the center console (e.g. a turbo washer switch) and manually toggle to start. Bonus: theft deterrent!
Refer to the following for 1984 cars only:
For 1984T models with the 4N71B automatic and a 4-pin inhibitor switch:
With the locking tab on top and wires facing away from you:
Top-left: Pin 1
Bottom-left: Pin 2
Top-right: Pin 3
Bottom-right: Pin 4
- Connect pins 1 and 2 to the neutral switch.
- Connect pins 3 and 4 to the reverse switch.
Start Your Engine
- Congratulations! You did it. Lower the car carefully and fire up the engine. You might hear some unfamiliar sounds—use your instincts to distinguish between normal break-in noise and real issues.
- Visit your trusted mechanic for final pedal adjustments and proper clutch bleeding.
- A slight whine when releasing the clutch at first is normal. Allow some time for the clutch hardware to wear in.
Required Adjustments
You'll probably notice that your idle is approximately 1000 rpm higher!!! It needs to be adjusted if you want to pass emissions. For the N/A cars, use the idle adjusting screw by the throttle body. For the turbo, you'll need the 5-spd ECCS for idle adjustment.